Here are the steps, if you want to make your own.
Step one:
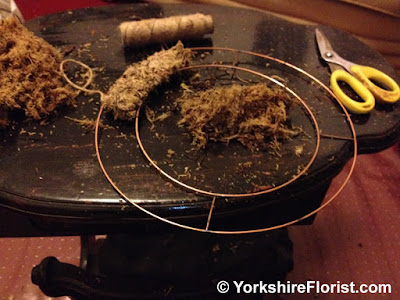
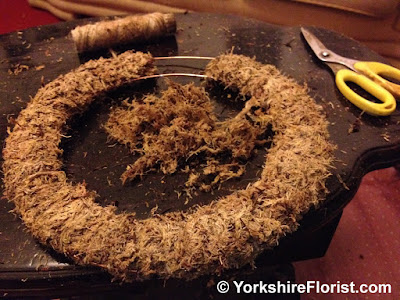
Using either string or binding wire, pack a wire ring with moss.
Method; secure string or binding wire to the ring, add a fistful of moss between the outer and inner ring, wrap the string or wire around the ring and the moss tightly to hold it in place. Repeat until the ring has an even amount of moss all the way around.
Step two:
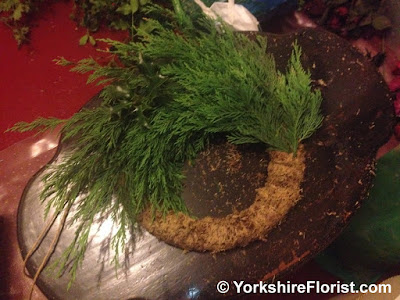
Add the green background to your wreath. This can be just holly, cupressus, fern, conifer or any type of greenery you like. Avoid using greenery that wilts or shed if you want your wreath to stay green until the end of Christmas.
Method: There are various ways of fixing the greenery to the wreath base. Here are a few,
- Add the stems of greenery one at a time, securing each piece with string or binding wire, hiding the string or wire with the next piece. Work around the ring.
- Cut wire pieces 7-10 cm, bend in half. Add greenery stems one at a time, securing each with the wire, either around the ring, or through the ring (like a staple). Work around the ring, hiding the last wire with the next piece of greenery.
- Wire bunches of greenery together and bind with wire. You can bunch together the same or mixed greenery to add to your wreath. As you are not building up directly onto the ring, you can work around the wreath, or work from the outer edges into the middle (see pics).
Step 3:
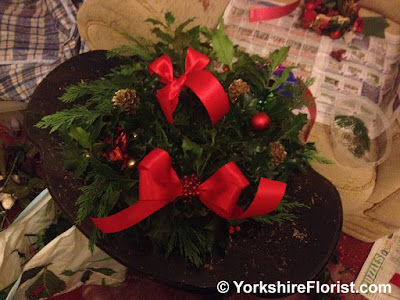
Decorate your wreath. You can add almost anything to your wreath. You can stay traditional and add cones, ribbons, cinnamon sticks, dried fruit, berries etc. Using real berries that are already on the holly should be done with caution as they may fall from the holly, especially is you are hanging the wreath on your front door. Squished berries can be slippy. You can add other Christmassy decorations, such as tinsel, baubles, snowflakes, or anything else that is small that may be hanging from your Christmas tree. You can match your door wreath to your house decor, door colour, curtains etc. You can add things that are individual to you, photos (laminate them if they will get wet), football badges and ribbons, trophies, small animals, teddies and other stuffed toys, or anything else at all.
You can also just leave your wreath plain, if that's what you like. It can be as bare or as busy as you like, in a symmetrical design or a lovely festive mess.
Method; attach wires securely to your decorations. Push the wire through the moss where you want to place the decoration, and pull through at the back until your decoration is in place. Then, either push the wire back into the moss from the back until the wire is flat (you may need to trim the wire first), or push the wire through your greenery and wrap it tight around the ring.
Some decorations, such as tinsel, ribbons and bows can be tied directly onto the wreath, around the ring or around the greenery. This is a less precise way of adding decorations, but works fine with busy non symmetrical designs
Wreath 1 - Add artificial berries
Wreath 1 - Add red bow
Wreath 2 - Add cones, berries, flowers, ribbons
Wreath 3 - gold sprayed cones, berries, baubles, tinsel, red pearls, red bows
Step 4:
Back your wreath. Adding a plastic, cellophane, or polythene backing to the back of your wreath is optional. I back all the wreaths I sell as I do not know the customer's intention for the wreath when purchased. Skipping this step will not affect the look of your wreath, and it will not affect the life of your wreath very much. It may help the damp moss to retain some moisture. The main purpose of the backing is to protect the surface of your door, and to avoid any moss shed from building up on your doorstep. If you are happy to clear up any mess caused by a natural wreath, or if your wreath is to be displayed somewhere such as a gate post or at a cemetery, you can skip this step. I would recommend this step is you have a wooden or painted door.
Method; you will apply strips of cellophane or polythene to the ring using staples. You can buy ready made backing strips and long staples or mossing pins, or you can easily make your own. Simple cut 5 cm lengths or wire, and bend to make the pins. The backing can be made from sandwich bags, carrier bags, or cellophane from cut flowers.
Pin the backing around the outside of the ring first, then the inside. As the inside is smaller, some folding and overlapping will be necessary to keep the lining flat. Overlap the end over the beginning by about 3 cm. Trim the length. Trim any excess from the inner ring.


No comments:
Post a Comment